
Hand rearing is a notoriously difficult task for even the most experienced cockatiel breeders. It’s time consuming, expensive, exhausting and it can very often turn out tragic. However, with enough research and the right tools, raising a friendly cockatiel chick can be both very possible and very rewarding.
CONTENTS

Brooders
The first thing you need to think about when taking in a chick is constructing or purchasing a brooder. A brooder, much like a nest, is a small, warm and safe space a chick will stay in until it hits fledging (the point where it learns to fly). It must be able to keep a stable temperature, keep the chick away from any possible dangers such as other animals, must be easy for you to access and observe the chick in, and must be clean and sanitary or easy to clean and sanitise.

If you’re thinking about breeding cockatiels as a long-term hobby, you may wish to purchase a professional brooder, as they are much more reliable in terms of temperature regulation and overall safety. However, this may not always be possible, especially if you hadn’t planned on breeding. In these instances, you may wish to build a brooder yourself. The following items will be necessary to construct a home brooder:
- A ‘base or container’. The best containers to use as brooders are usually small cardboard or plastic boxes with high sides, as they will both protect the chick from its environment and keep warmth. Glass containers or ceramic containers are not recommended as the container itself can store heat too willingly and burn the chick if it comes into direct contact. The container you use should be small enough to replicate a nest, but large enough to allow the chick to flap its wings without hitting the sides when it comes to fledging.
- A ‘shield’. Shields are used to cover a brooder and can include large mesh or plastic covers, or small bird cages (as these provide both protection and an area to hang towels and blankets to ensure the brooder is dark). This will protect the chick from its environment, ensure any outside forces are kept away – such as pets – and ensure the chick itself cannot accidentally get out of the brooder and injure itself. Any shield you are using must provide adequate ventilation, so the chick has access to fresh air, and must be easy for you to access when feeding the chick.
- Substrate. Substrate is the material used inside a brooder as flooring. The best types of substrate to use inside a brooder are usually the easiest to access: newspaper, tissues and paper-towel. This makes the brooder easy to clean, makes it less likely the chick will ingest anything dangerous and also makes it easy to keep an eye on the droppings of the chick to identify any health issues.
- Heat Sources. The best heat source for a chick is usually an infra-red heat lamp. These lamps are commonly used for reptiles and are much stronger heat-wise than general lights. They are not as bright as normal lights and will allow for both you and your chick to sleep without being kept awake by the brightness. You will need to keep monitoring the temperature of the light to ensure it is working effectively to keep your chick warm. You will also need to ensure that your chick has no access to this light, as many chicks have suffered severe injuries due to heat-light burns.
You may also choose to install a heat mat beneath your brooder for added warmth. When used and monitored correctly, heat mats can be incredibly useful. However, heat mats can be difficult to temperature-gauge at times, and you will need to constantly ensure the temperature is not rising too high to keep your chick from burning against the brooder floor. - Thermometer. A thermometer placed within a brooder is vital to properly manage temperature. There are many instances where heat mats and/or lights have failed or broken and, due to having no thermometer inside, rearers have failed to notice and have caused their chicks to freeze. A thermometer should always be implemented, no matter how confident you are in keeping the temperature without one.
- Covers. Cockatiel chicks, until they reach fledging age, are kept in a dark, hidden nest with their parents. This needs to be replicated in order to keep a chick healthy and to decrease stress levels. For this reason, it’s best to use a clean towel, sheet or blanket to cover most or all of the brooder.
Young chicks, especially hand-reared chicks, will have very low immune systems and will require a constantly clean brooder to stay healthy. For this reason, it is recommended that you change soiled substrate in a chick’s nest each time you remove the chick for feeding. This may sound excessive, but chicks are prone to accidentally ingesting faeces, which can lead to severe illness. They can also end up with droppings stuck to their skin, feathers or other extremities which, when dried, can become very hard and very difficult to remove.
Your Toolkit
Gathering your hand-rearing toolkit before removing a chick for handrearing is essential. Not only will it help your chick in terms of safety and health, but it will also turn a potentially stressful experience into a far easier and more predicable one for you, leading to better outcomes for both you and your chick.
Feeding Tools
Selecting a feeding tool can be a difficult decision and it’s important to note the pros and cons of each tool before making any decisions.
Crop Needles

A crop needle consists of a barrel and plunger (similar to a syringe) attached to a long ‘tube-like’ needle down which the food travels. Food is sucked into the barrel by pulling back the plunger and then, while the chick is held in a safe position with no pressure on the chick’s crop, the needle is inserted down the esophagus and into the birds crop, where the plunger is pressed to release formula.

This method requires a lot of experience and it is best you get a vet to demonstrate this before you try it yourself.
Pros:
- Eliminates mess
- More time-efficient than spoon or syringe feeding
- Reduces the chance of aspiration, as the tube bypasses the trachea (air-tube)
- Allows for easy acceptance of medications when necessary, as the chick cannot taste what’s being fed
- Usually contains measurements on the barrel that allow for consumption to be accurately measured.
Cons:
- Can be expensive, as needles need to be replaced at least once a week to prevent hardening which could cause damage to a chick’s crop.
- Can cause damage to a chick if the hand feeder is inexperienced. For example, scaring or over-stretching from internal pressure, which can damage crop muscles and impede a chick’s ability to digest food on its own.
- Weaning may become difficult, as the needle’s elimination of taste in the feeding process may cause the chick to become disinterested in solid foods and their flavours.
- Chick control over food consumption is eliminated, which may cause problems if the owner is not heavily monitoring food intake each feeding, as the chick is not able to refuse excess food. May also cause issues with self-control and feeding later when the chick is weaning, as it may not understand when it is full and may over-eat.
- Chick cannot indicate to rearer when its food is too hot or too cold (if formula is not measured via thermometre, which it should be at each feed), which could potentially lead to crop-burns or slow-crop.
Syringes

Syringes consist of a barrel and a plunger. The plunger is pulled back to suck food into the barrel and the syringe is then inserted into the chick’s open mouth through the corner of the chick’s beak, where the plunger is pressed to release food.
Syringes are the best tools to use for feeding very small chicks, as they lead to less mess than spoon-feeding and easier control over consumption. Syringes must also be replaced often in order to prevent bacterial manifestation within the syringe barrel.
Pros:
- Less risky when compared to crop needles, as they only enter the beak of a chick rather than traveling down into the crop.
- Less difficult to manipulate than a crop needle, as there is less risk and less experience is needed.
- Allows for some taste to be experienced, making weaning easier.
- Easy control over consumption, as the amount of formula consumed can be measured using the scale on the syringe’s barrel.
- Inexpensive, as bulk syringes are available for a relatively cheap price.
Cons:
- Messier than tube-feeding, as chicks will often move their heads during feeding which results in formula spilling.
- Can cause damage to the mouth if the chick is too vigorous with feeding, as the syringe can hit the back of the throat and cause tissue damage.
- Aspiration can occur if too much food is expelled at once and the chick is unable to breathe, causing it to inhale food.
- Air bubbles can form in the crop if food is expelled from the syringe too slowly, causing discomfort and other potential issues.
- Exceptionally high or low formula temperatures may be difficult to gauge for the chick if the syringe is situated far back in the mouth, and the chick may not be able to indicate to its owner that the formula is too hot or cold for consumption. This can lead to crop burns due to heat, or slow-crop due to chilling.
Spoons
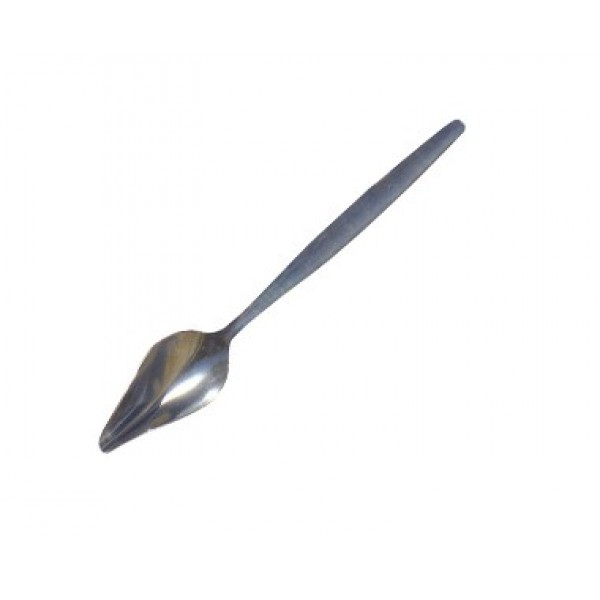
Hand-rearing spoons are plastic or metal spoons with an upwards curve at the end to allow entry into the beak. Although metal spoons are available, they can conduct heat very easily and result in burns in chick mouths, and can also contain certain types of metals such as zinc that can lead to heavy-metal poisoning. The best and least expensive types of spoons are usually plastic spoons which have been bent using boiling water.
Pros:
- Easy to maneuver
- Usually quickly accepted by chicks, as they are shaped similarly to a parent-cockatiel’s beak.
- Easy to purchase and generally inexpensive
- Allows for chick control its food consumption, reducing the chances of overfeeding.
- Allows for chick to temperature-gauge food and reject it if it is too hot or cold, reducing the chances of temperature-related internal damage.
- Least likely of all options to cause scaring or other contact-related damage
- Allows for the chick to taste is food, making transitioning to solid-foods easier.
- Easiest tool to clean and sanitise.
Cons:
- Messiest of all the feeding tools. Formula will drip off the spoon and will likely drip off the chick’s beak.
- Less time-efficient, as chicks are able to choose when and for how long they’d like to consume food. Certain chicks may also be generally messy and muddled eaters, trying to consume food from the top or side of the spoon rather than the tip and will be messy and require feeding, adding to time spent feeding.
- Difficult to gauge food consumption, resulting in greedy chicks being able to eat more than their recommended 10% at each feed if not monitored. This can cause health problems such as slow-crop, liver damage and obesity.
- Only a reliable option for chicks aged 2 weeks (around 40 grams) or older. Younger chicks may not be able to wrap their beaks around the spoon, which can result in an excessive amount of mess and possible aspiration. Younger chicks are also less likely to control their feeding habits, making spoon-feeding the perfect opportunity to over-indulge.
General Hand-Feeding Assistance Tools
Although these tools are listed as ‘assistance tools’, they are still completely necessary items to keep to ensure the health of your chick. These tools include:
- Thermometer. The temperature of formula should always be measured with a thermometer before being fed to a chick. This is to prevent burns to the crop or chilling, which can result in slow-crop and other potentially deadly health problems. Measuring temperatures with your wrist is not adequate and should only be used in emergencies where a thermometer is not available, as a cockatiel’s crop will be much more temperature-sensitive that human skin, and human measurements will be inconsistent.
- Probe Covers or Glad Wrap. Glad Wrap and Probe Covers cover the tip of the thermometer to prevent it from damage via contact with liquids – damage which will almost certainly occur, especially if the formula is excessively hot.
- Glass Measuring Cup. A glass measuring cup can be used to mix formula before feeding to chicks. Small glass containers are recommended as they keep heat, preventing formula from chilling and making thermometer measurements more accurate.
General Care Tools

Other necessary tools that you will need to keep your chick happy, healthy and safe include:
- Paper Towel. Paper towel has a range of different uses, such as to dry feeding tools after sanitation, to clean formula off feeding tools, to clean droppings and to clean your chick off after a messy feed.
- Large Bowl or Container. In order to keep your formula warm – which is especially necessary if your chick is difficult to feed, or you have multiple chicks to feed at once – you will need a large bowl or container which can be filled with warm water. The formula-mixing container should fit comfortably inside this bowl.
- A Fork or Other Mixing Implement. This should be either a disposable plastic fork, which can be changed after each feeding or at the end of each day, or a stainless steel spoon (as other metals such as zinc can cause metal poisoning) that can be properly sterilised without rusting. Metal spoons with plastic handles are not recommended, as bacteria can be both difficult to remove from plastic and can hide in the area where the plastic is attached to the metal – as sterilising fluids may not reach these areas.
- Sterilising Fluid. There are many types of sterilising fluids on the market, but the most popular one for chick-rearing is Milton. This fluid is generally used for sterilising baby bottles and pacifiers, and is therefore created to be safe for young, immunodeficient creatures such as cockatiel chicks. You must always follow the instructions on your selected steriliser to ensure your tools are adequately sterilised and safe for chicks. You should always sterilise anything that is going to come into contact with your chick, especially feeding implements. Formula mixing containers, feeding tools and mixing forks should all be sterilised before feeds.
Although your sterilising fluid may indicate otherwise, it is always safer to rinse your feeding implements in boiling water before use to ensure no steriliser is left on them. Make sure these tools are cooled before feeding.
To learn about the dangers of un-sterilised tools and their effects on chick health, see the ‘Crop Stasis/Sour Crop’ section of the article: ‘Hand Rearing: Common Cockatiel Chick Illnesses and How to Cure Them’. - Large Container for Sterilising. All tools will need to fit within this container, but it should not be so large as to require an unnecessary and wasteful amount of sterilising fluid.
- Gram Scales and Logbook. It is vital to weigh your chick using gram scales before and after each feed. This will help you to ensure that the chick is only consuming the recommended 10% of its body weight and will prevent any possible health problems that result from over or under-feeding such as slow crop, sour crop, and liver or other organ damage.
It is also vital you keep an accurate logbook of all your chick’s weigh-ins. This will help you to identify trends in weight loss or weight gains, and to recognise when possible illnesses such as anorexia, stunting or other conditions that prevent weight-gain occur.
Click on the following button to download a free blank pdf logbook for chick weight recording:
Formula

When hand-rearing a cockatiel, it is completely necessary that you use a vet-approved formula to feed your chick. Making your own formula from a recipe or using other moist or watered-down foods will be not provide the correct nutrition for your chick and many chicks have died due to hand-made formulas being too thick or too thin to satisfy their hunger.
Commercial formula is readily available at most pet stores or online and is formulated using the best possible ingredients to aide your chick’s weight-gain, growth and overall development. In fact, some formula-fed cockatiels have grown to be even healthier than their parent-fed counterparts, although hand-fed chicks usually have a slower growth rate than parent-fed chicks.
The brand of formula you select is purely up to you, however, you should consider commercial availability, popularity of the formula and the formula-mixing requirements before you choose. Due to the vulnerability of a chick’s digestive system, it is highly recommended that you stick to one type of formula and if you do feel the need to change formulas, you should approach an avian vet for advice before proceeding.
The most popular and widely available formula in Australia is Vetafarm’s Neocare formula, although Wombaroo Passwell’s Bird Hand Rearing Food is also relatively popular. The below tables analyse the nutritional contents of these Australian formulas:
Note: Sodium Content of ‘Joy ProStart Hand Rearing Formula‘ was unavailable.
Click on the name of a formula to find online purchasing options.
| Avione | Whistler | Vetafarm | Passwell | Joy | Tropican | |
| Protein | 22% | 15.5% | 21% | 24% | 5.8% | 22% |
| Fat | 5% | 10% | 15% | 9% | 3.6% | 11% |
| Fibre | 3.5% | 3.0% | 4% | 5% | 1.8% | 3.5% |
| Sodium (Salt) | 0.2% | 0.1% | 0.5% | 1% | N/A | 0.3% |
Other brands of commercially available formulas in the US and UK:
Note: Sodium contents of Harrisons, Kaytee and Lafeber formulas were unavailable.
Click on the name of a formula to find online purchasing options.
| Harrisons | Psittacus (Mini) | Kaytee | Lafeber | Nutribird | |
| Protein | 18% | 21.4% | 22% | 17% | 21% |
| Fat | 11% | 10% | 9% | 8% | 8% |
| Fibre | 4% | 4.2% | 5% | 1% | 3% |
| Sodium | N/A | 0.13% | N/A | N/A | 0.2% |
Emergency Kit

When it comes to hand-rearing cockatiels, there are many types of problems that can come your way. These problems can range from relatively minor – such as splayed legs – to life threatening – such as sour crop. The faster you are able to treat these conditions, the more likely your chick will be to survive. For this reason, having the following items in your emergency kit will be vital.
- Avian Vet Phone Numbers. This is the first and by far most important item in your kit. Not all illnesses or conditions can be treated without professional intervention and some treatable conditions may become too advanced for home treatments. Ensure the vets you have listed are avian veterinarians, as regular vets will likely not have the appropriate resources or testing facilities to treat birds, and this can result in more expenses overall.
The following link lists licensed avian vets in Australia: https://www.parrotsociety.org.au/Avian-Veterinarians - VetWrap. VetWrap is a type of tape that is used to tape feet to correct splay-leg and other similar conditions. This tape is far safer than other types of tape, as it sticks to itself rather than to the bird’s skin, feathers or down, eliminating the possibility of causing damage when removing it.
- Nystatin/Nilstat. Nilstat is an over-the-counter medication that is used to treat oral thrush in humans, but which can also be used just as effectively to treat yeast problems, such as Candida, in cockatiels. This medication is relatively harmless, even when accidental overdoses occur. It is best to ask your vet what dosage is appropriate for your chick.
- Gastrolyte. Due to this being an electrolyte solution, Gastrolyte can often help to re-hydrate and energise chicks suffering from lethargy, dehydration and other issues. 1-2 ml should be sufficient in a chick of 30 grams and can be warmed in a microwave, mixed to rid of any hot-spots and fed to the chick via syringe or in formula.
- Apple Sauce. Apple sauce is commonly used to treat crop problems such as slow crop in chicks, as it speeds the crop-emptying process. If crop issues are detected early, a 3/4 formula and 1/4 apple sauce mix should help. Note that apple sauce can cause dehydration itself, so should only be given to a chick when necessary and preferably no less than once a day. If dehydration occurs, extra electrolytes via a Gastrolyte solution may be necessary.
- Isolation Brooders. If you are rearing more than one chick, having another isolation brooder on hand will be necessary. If a chick in your clutch appears to become ill, you will need to isolate it from its clutch to ensure it does not pass any potentially contagious illnesses to the other chicks.
Am I Ready?
Now that you’ve gathered your essentials, you’re officially ready to enter the cockatiel-rearing research stage! Keep an eye out for the next article in this series, ‘How to Hand Rear Cockatiel Chicks‘, to learn more.

References
https://en.wikivet.net/Avian_Respiration_-_Anatomy_%26_Physiology
https://www.thespruce.com/meaning-of-crop-385210
https://birdkeeper.com.au/products/a-guide-to-incubation-and-handrearing?variant=29193748283491 https://www.goodreads.com/book/show/2006874.The_Merck_Merial_Manual_for_Pet_Health https://birdkeeper.com.au/products/a-guide-to-cockatiels-and-their-mutations-as-pet-aviary-birds-revised-edition-hard-cover?variant=29194753671267